LASH LIFTING – TIPS, RECOMMENDATIONS AND PROCESS
Tips and recommendations
- Fill out their client card with the client and make sure it doesn’t contain any discrepancies or factors that might prevent successful eyebrow lamination.
- Let the client sit down comfortably.
- Take a photo before and after lamination and share the result on social media while mentioning Lashes PRO.
- We recommend always using gloves due to medical and hygienic reasons.
- Always massage packages with liquid before opening.
- Wash and disinfect your hands/gloves.
Preparation for lash lifting
- Cover the client’s hair with the Lashes PRO hair band and cover their upper body with a towel to protect their clothes.
- Remove all make-up traces using water based makeup remover (do not use removers that contain oil) and clean cotton swabs.
- Clean the lashes and the eye area using the Lashes PRO cleaning foam.
- Brush the eyelashes using special brushes.
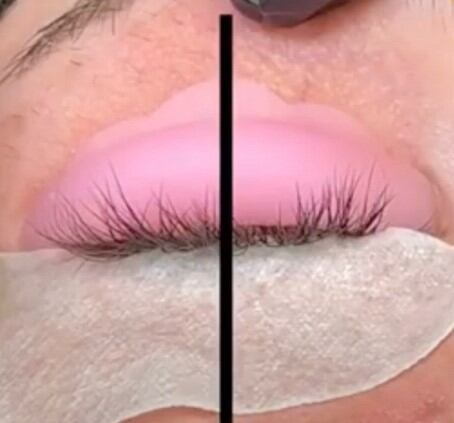
- Put a Lashes PRO gel pad under each eye. Use these pads to fixate the lower lashes so that they don’t get in the way while you’re treating the upper eyelashes.
- Map the shape of the eye and ask the client about their wishes. Choose the most suitable shape and size of the Lashes PRO silicone curlers. If necessary, adjust them to fit on the eyelid perfectly. Don’t forget that the middle of the curler should be placed directly into the middle of the eyelid.
- Apply the Lashes PRO glue or the Lashes PRO Glue balm on the bottom of the curler and place it on the eyelid directly to the roots of the lashes. Hold it in place for about 20 seconds until the curler sticks to the eyelid.
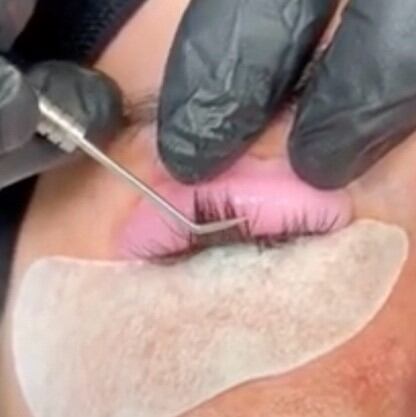
- Now apply small amounts of the Lashes PRO glue or the Lashes PRO Glue balm to the front of the silicone curler and use the Lashes PRO Separator or a Y-shaped brush to attach the eyelashes. We recommend starting from the middle of the curler.
- Evaluate the quality and the thickness of the eyelashes when they’re all glued to the curler - you will need this information when deciding how long the liquids should be applied for.


Liquids application
Step 1 - Lifting cream
- Prepare a timer and keep it ready.
- Use a microbrush or a brush to apply a small amount of the Lashes PRO lifting cream to the eyelashes.
- DO NOT APPLY TO THE ROOTS OF THE LASHES, start approximately 2 mm from the roots.
- DO NOT APPLY ON THE ENTIRE LENGTH OF THE EYELASHES. Apply the cream approximately to 1/3 or 2/3 of the length of the eyelashes (the length to which you apply the cream influences the depth of the curvature).
- Start the timer immediately after applying the liquid.
- Length of application:
- Very fine and fine lashes: 4-5 minutes.
- Dyed lashes: 5-6 minutes.
- Natural healthy lashes: 6-8 minutes.
- Very strong healthy lashes 8-10 minutes. - Check the eyelashes in regular intervals during the procedure. Listed time is only illustrative and it’s necessary to individually evaluate how the lashes react to the product. Temperature in the room has a major influence on the length of the procedure. Cold can lengthen the time needed, while warmth can significantly shorten it.
- As soon as the lashes soften, which can take less or more time than described above, remove the cream using a clean cotton swab. Avoid getting the liquid to the roots of the lashes and make sure the lashes stay glued to the curler. NO WATER is used between steps 1 and 2.
Step 2 - Neutralizing milk
- Use a microbrush or a brush to apply a small amount of the Lashes PRO neutralizing milk directly to the places where you have previously applied the lifting cream.
- Length of application:
- Very fine and dyed lashes: 5 minutes.
- Natural healthy lashes: 6 minutes. - Use a cotton swab to remove the neutralizing milk from the eyelashes. Make sure that the lashes stay glued to the curler.
- Now it’s time for ELECTIVE DYEING AND CARE:
- Prepare the dye of choice and apply using a brush. Apply it according to the manual and then remove the excess dye from the lashes using a cotton swab.
- Apply the Lashes PRO Lash botox care according to the product manual. Following the application time, remove the product using a cotton swab.
Step 3 - Hydrating serum
- Use a microbrush to apply the Lashes PRO hydrating serum to the lashes and release the lashes from the silicone curler with care.
- Then use the same brush to apply the hydrating serum to the eyelid under the silicone curler and take the curler off from the eyelid with care.
- Use a cotton swab to remove excess serum from the eyelid.
- Remove the gel pads from under the client’s eyes.
- Brush the lashes using special brushes.
- Take a photo after the lash lifting and share it on social media while mentioning Lashes PRO.
- Explain to the client how to take care of their lashes now and give them a printed care manual to take home together with brushes.


